
Flooring Calculator: Box, Piece, and Cost Takeoff
Turn measured floor areas and the exact product label into a traceable flooring material estimate. Check net area, a stated allowance, carton coverage, individual piece count, and optional cost inputs before ordering.
Example Projects
Flooring Parameters View Results
For standard hardwood, an 8% waste factor is recommended. Plank widths are commonly 3.25 inches, length is typically 36 inches.
Installation Layout Pattern
Individual Plank / Piece Dimensions (Optional)
Box Packaging, Waste & Pricing
Calculations Results
View Calculation Breakdown
Detailed Measurements Live
| Net Flooring Area | 0 sq ft |
| Boxes to Order | 0 boxes |
| Planks / Pieces to Order | N/A |
| Waste Allowance | 0% |
| Flooring Material Price | $0.00 |
| Installation Labor Price | $0.00 |
| Total Project Cost | $0.00 |
How this was calculated:
1. Surface Area: Length × Width
For Multiple Rooms, individual room areas are calculated separately and summed.
2. Waste Material Added: Area × Waste Percentage
3. Gross Flooring Area: Net Area + Waste Material
4. Boxes to Order: Gross Area ÷ Square Footage per Box (Rounded UP to next whole box)
5. Planks / Pieces Required: Gross Area ÷ Individual Plank Area (if dimensions provided)
6. Total Budget Plan: Material Costs + Installation Costs
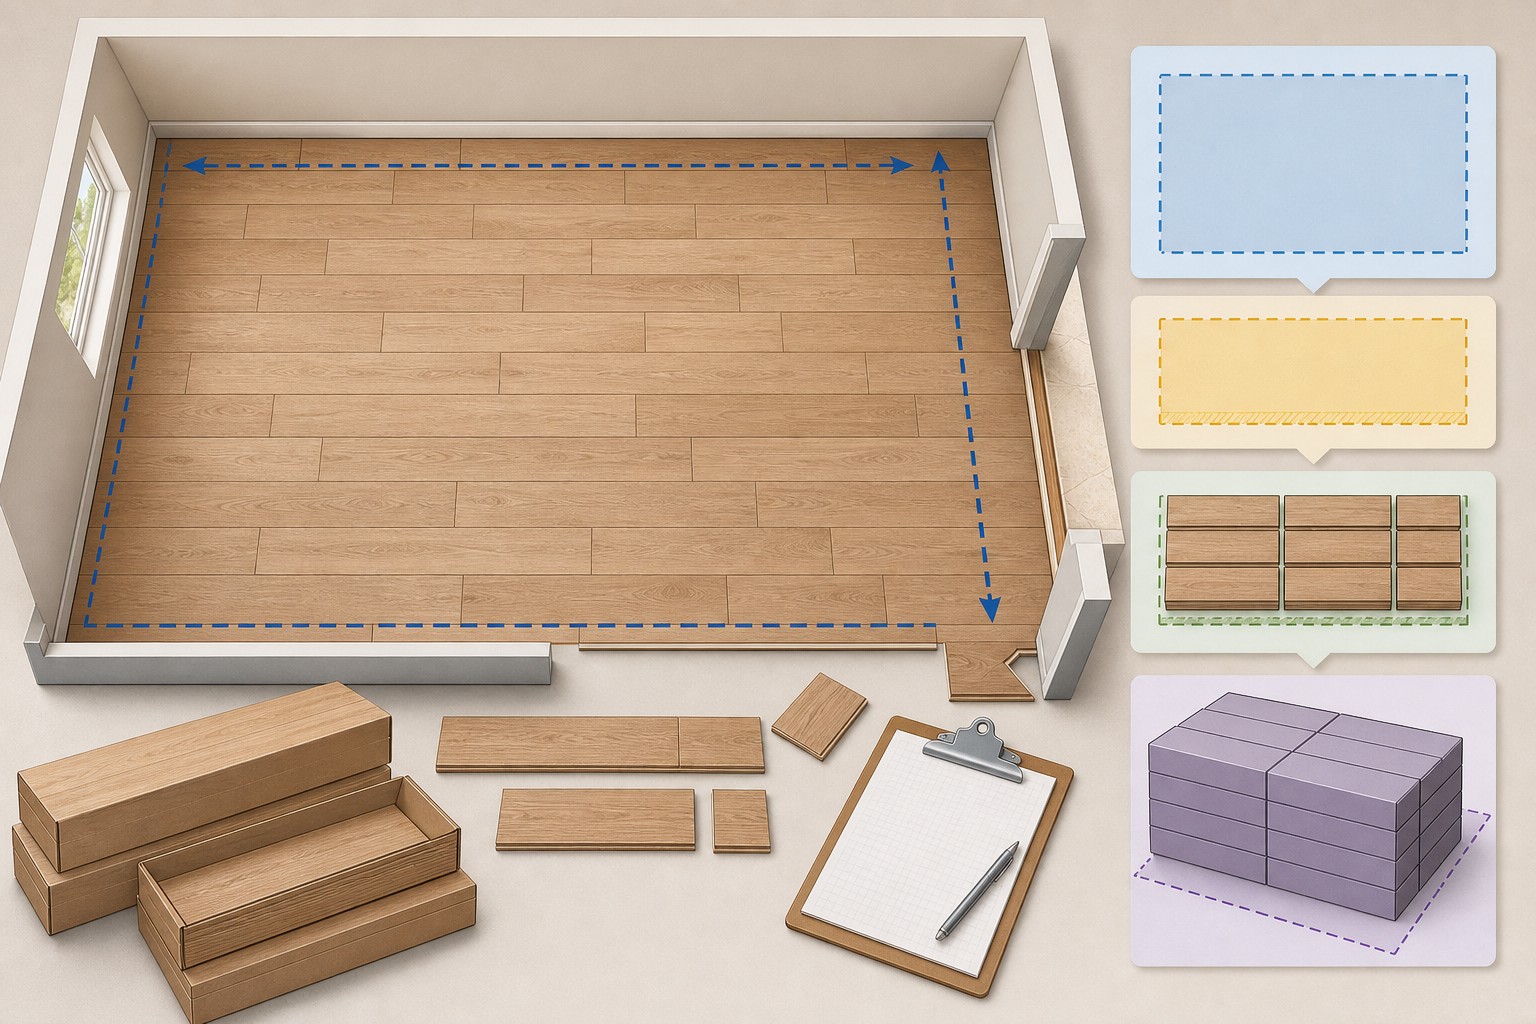
Check the method before you use the estimate
This page documents the formula, assumptions, and any specific external sources used for this tool.
See the methodPlanning estimate What this result can and cannot tell you
Material-order planning only. Verify the selected product's current package coverage, piece dimensions, installation instructions, warranty conditions, supplier quote, and project requirements before purchase or installation.
How the Flooring Calculator works
These notes describe the calculation used on this page and the assumptions that can change a real-world result.
Net area = the sum of the entered room rectangles. Allowance area = net area × entered allowance percentage. Gross material area = net area + allowance area. Cartons = ceil(gross material area ÷ entered coverage per carton). Individual pieces = ceil(gross material area ÷ entered piece face area).
Assumptions on this page
- The calculator treats each entered room as a simple rectangle and adds the results. It does not automatically subtract islands, openings, stairs, waste, closets, transitions, or irregular features; record those conditions and adjust the takeoff deliberately.
- Carton coverage, piece length, piece width, prices, and the material selector's starting values are user inputs. Replace every default with the current label or supplier information for the exact product being ordered.
- The allowance is a planning input, not a universal rule. A selected pattern changes the tool's suggested value, but the calculator does not inspect the actual layout, starting point, cut reuse, room shape, or stock availability.
- The individual-piece result divides gross area by the entered rectangular face area. It does not model joints, plank direction, stagger, borders, roll width, seams, defects, or which offcuts can be reused.
- If a box price is entered, material cost uses rounded cartons times that price. Otherwise material cost uses gross area times the entered price per square foot. Installation cost uses net area times the entered installation price per square foot.
- Costs do not automatically include tax, delivery, removal, transitions, trim, underlayment, adhesives, moisture work, floor preparation, tools, or any other project-specific item.
- This is a material-planning worksheet, not flooring design, a product-suitability determination, a moisture or substrate evaluation, or installation guidance.
Sources used on this page
- NIST Guide to the SI, Appendix B.9: Area conversion factors Supports the displayed area conversion: 1 square foot equals 0.09290304 square meter, and 1 square yard equals 9 square feet.
- National Wood Flooring Association Installation Guidelines Explains why product and adhesive manufacturer instructions, substrate conditions, and the selected installation method cannot be replaced by a generic quantity calculator.
- Shaw Floors product page: carton coverage and order estimator example An example of product-specific carton information and installation documents that should be checked for the exact product. It is not a universal coverage recommendation or an endorsement.
Everything behind the Flooring Calculator
Formulas, reference charts, and detailed answers — expand any section you need.
Use cartons and individual pieces as two different checks
The calculator provides both carton and piece outputs when you supply both sets of inputs. They answer different questions and can legitimately differ. The carton label is the purchase unit; the individual-piece figure is a face-area cross-check that still needs a layout review.
| Output | Current arithmetic | What it cannot decide |
|---|---|---|
| Net area | Sum of entered room rectangles | Which areas are included, excluded, or separately finished |
| Allowance area | Net area × entered allowance percentage | Actual cut loss, reusable offcuts, damage, or future-repair needs |
| Cartons | Gross area ÷ entered carton coverage, rounded up | Whether the product label, coverage, lot, and supplier availability are current |
| Pieces | Gross area ÷ entered rectangular piece face area, rounded up | Plank direction, joints, borders, seams, pattern starts, and pack contents |
| Cost | Rates entered by the visitor using the tool's stated order of operations | Supplier quote, tax, freight, accessories, preparation, and labor scope |
In the 198 sq ft example above, an entered 48 in by 7.25 in plank has a face area of about 2.42 sq ft, so the tool displays 82 pieces after rounding. Do not use that number to override the carton label; it is a second arithmetic check. Confirm pieces per carton, nominal versus actual dimensions, and the planned layout before ordering.
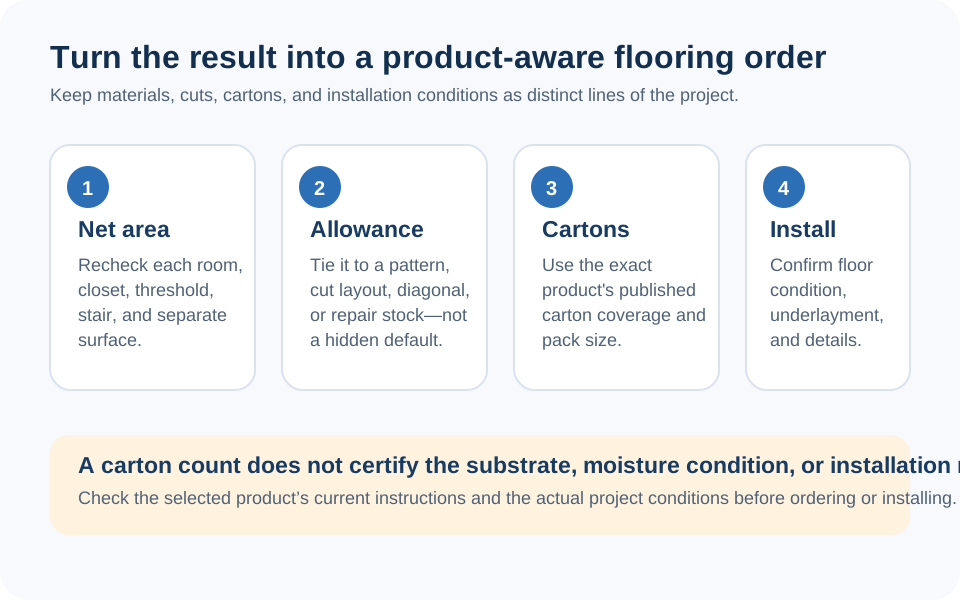
Use the calculator as a documented order worksheet
A flooring estimate is most useful when someone else can retrace it. Start with a simple plan of the finished floor field, then connect every calculator input to a note: a room measurement, product carton label, supplier quote, layout sketch, or owner decision about spare material. This page turns those inputs into quantity arithmetic; it does not decide which product, installation method, underlayment, adhesive, expansion treatment, or preparation is appropriate.
The material selector is a convenience for opening the form. Its coverage, piece dimensions, price, and allowance values are starting values in the current tool, not specifications for hardwood, laminate, vinyl, engineered wood, tile, or carpet. Replace them with the exact information for the product and installation you have chosen. For tile-specific quantity and grout planning, use the dedicated Tile Calculator and the companion Tile and Grout guide.
Measure the finished floor field before looking at cartons
Measure the surface intended to receive the product, not only the largest rectangle in the room. A clear sketch labels the main rectangle, closets, alcoves, doorways, transitions, columns, and areas that are intentionally excluded. Divide an L-shaped field into rectangular pieces and calculate each piece separately. In Multiple Rooms mode, the current calculator adds the entered rectangular areas; it does not infer an exclusion or decide whether a closet receives the same product.
The displayed square-yard and square-meter figures are conversion checks, not separate measurements. The NIST area conversion table lists 1 sq ft as 0.09290304 sq m and 1 sq yd as 9 sq ft. Keep the original measured units on the sketch so a later change can be checked without reverse-engineering a rounded output.
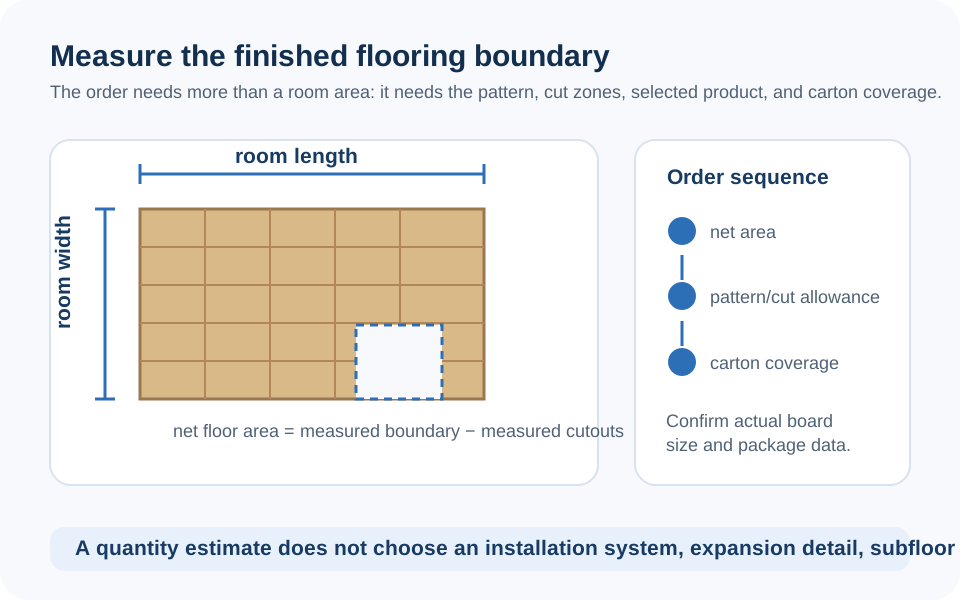
What the flooring calculation actually does
Once net area is known, the current tool applies the allowance you enter, not an allowance calculated from the room drawing. It then uses the entered carton coverage to round a carton count upward. In simplified form:
Worked calculator example: a simple 12 ft by 15 ft room has a net area of 180 sq ft. With an entered 10% allowance, the gross material area is 180 × 1.10 = 198 sq ft. If the exact carton label says 23.76 sq ft per carton, the tool calculates 198 ÷ 23.76 = 8.33 cartons and rounds to 9 cartons. This is arithmetic from those example inputs, not a recommendation to use 10%, 23.76 sq ft cartons, or any particular product.
For a non-rectangular space, calculate each component separately or use the Square Footage Calculator to make the geometry visible. Do not hide a missing field, island, stair opening, or transition inside a generic percentage.
Make the allowance a project decision, not copied advice
An allowance should explain what it covers. Write down whether it is for a shifted starting line, edge cuts, a diagonal or repeated pattern, narrow rooms, damaged material, future repairs, a supplier policy, or a deliberate spare quantity. The pattern cards in this calculator change the current suggested allowance values: straight and staggered set 8%, diagonal sets 12%, and herringbone or chevron set 18%. Those values are tool presets. They do not read the room layout or prove that the selected percentage is suitable for a particular job.
A reliable check is to draw the actual first row, perimeter cuts, doorways, and transitions on the sketch. Mark which offcuts may be reused and which cannot. Then compare the documented allowance with the exact product availability and the owner's spare-material goal. An allowance can be increased or decreased only because the layout and order record justify it, not because another project happened to use the same product category.
Read the optional cost result correctly
The cost panel is a calculator, not a quote. If you enter a positive price per box and the tool has a rounded box count, material cost is rounded cartons × price per carton. If no box price is entered, material cost falls back to gross area × entered material price per sq ft. Installation cost is always net area × entered installation price per sq ft. The tool then adds those two figures.
For example, with the 9-carton result above, an entered $67 per carton produces a material arithmetic result of $603. If net area is 180 sq ft and an entered installation rate is $3.50 per sq ft, installation arithmetic is $630. The displayed project total would be $1,233. That example excludes every item that was not entered: removal, repairs, moisture testing or mitigation, subfloor work, trim, transitions, underlayment, adhesive, delivery, tax, waste disposal, and scope changes. Use an actual supplier and installer quote for a purchase decision.
Where the quantity tool stops
Quantity arithmetic cannot determine product suitability, moisture conditions, substrate condition, flatness, structural performance, room use, floor-height transitions, installation method, adhesives, fasteners, acclimation, movement treatment, ventilation, warranties, or code compliance. These decisions are product- and project-specific. The National Wood Flooring Association installation guidance emphasizes following flooring and adhesive manufacturer instructions and evaluating the actual substrate; a generic calculator cannot replace that work.
Check the exact product's package label, technical documentation, installation instructions, and warranty before purchase. The linked example product page shows why a product-specific carton amount and documentation matter. It is only an example, not a recommendation or endorsement.
Final carton and layout check
- Confirm every measured room, exclusion, transition, and included closet against the latest sketch.
- Replace default coverage, dimensions, and prices with the exact carton and supplier information.
- Keep the net area, stated allowance, gross area, rounded carton count, and planned spare quantity as separate lines.
- Compare carton coverage with pieces per carton and a scaled layout before purchasing.
- Verify the selected installation system and all accessories with the relevant manufacturer instructions and responsible project parties.
If a formula, label, or output seems incorrect, use the contact page to report the calculator issue and include the inputs, browser/device, and expected versus actual result. The site team can investigate tool behavior; product selection and installation decisions remain with the responsible project professionals.
Frequently Asked Questions
How does the Flooring Calculator calculate boxes?
It adds the entered room areas, applies the allowance percentage you enter, divides the resulting gross area by the coverage per box you enter, and rounds up to a whole carton. Confirm the exact product label before ordering.
Are the coverage and price values shown when I select a flooring type product specifications?
No. They are calculator defaults that make the form usable. Replace them with the package coverage, piece dimensions, and current pricing for the exact product and supplier.
Why do the carton and individual-piece outputs not always match perfectly?
They use different inputs. The carton output uses stated coverage per box; the piece output uses the entered rectangular face area. Pack contents, nominal versus actual dimensions, joints, layouts, and cuts can make the figures differ, so check both against the label and layout.
Does the selected layout pattern calculate exact cutting waste?
No. It changes the calculator's suggested allowance preset, but it does not analyze the actual room shape, starting point, borders, or reusable offcuts. Set the allowance from a documented layout decision.
Can I calculate multiple rooms?
Yes. Multiple Rooms mode sums the rectangular areas you enter. Keep irregular areas, exclusions, different materials, and transitions separate so the result remains traceable.
How does the optional flooring cost calculation work?
With a box price entered, material cost uses rounded cartons times that price. Otherwise it uses gross area times the entered per-square-foot price. Installation cost uses net area times the entered installation rate. It is not a supplier or installer quote.
Can this calculator tell me which flooring product or installation method to use?
No. It is a material takeoff tool. Product suitability, substrate preparation, moisture, installation method, accessories, warranties, and code requirements must follow the exact manufacturer's instructions and project conditions.
How can I report a flooring calculator issue?
Use the contact page and include your inputs, device or browser, result shown, and the result you expected. That makes a calculation issue reproducible without publishing private project details.